Wednesday 30 September 2009

Little Birdie

This is a quick card made for a little baby boy who has taken his time to appear!! And it's not like I didn't have enough notice, but I did forget to make a card, but remembered in time so here it is!

It also fits the Secret Crafter challenge this week which is:

Animal Antics

I know my birdie is not doing anything but sitting there, but it is an animal! I've run a piece of card through the d'vine swirls Cuttlebug embossing folder, inked and rounded all edges. The birdie is taken from a template from Candy Doodles and I've also used the print from Candy Doodles.
The ribbons are from my stash and so is the charm (one that I found that I'd forgotton about!) I've tied the ribbon in one of my one 'bow' efforts as I'd cut it too short to make a proper bow! I never learn!

  • Backing papers: Candy Doodles
  • Embossing: Cuttlebug d'vine swirl
  • Everything else: My stash

PS If the layout of this post is a bit odd - something went strange with Mr Blogger and I can't get it back!


    Tuesday 29 September 2009

    Rockin' Robin!

    Another challenge, another sketch! This time it is Lili of The Valley, which is the following sketch:And I've used all paperbased elements of this card from the brand new very soon to be released Polkadoodle cd - Not For Girls. I've kept the card quite simple as I think the images are just so funny!
    I've resized the three birdies from their original intended size so that I could use them to fit the sketch. The two coloured papers are also from the cd - there is a section of plain colours which match up with all the different elements on the cd and are great for when you don't want too much going on with the card.
    The sentiment is also from the cd and I've just snipped part of it and layered it onto more backing paper. The brads are from my stash.
    • All paperbased elements: Not For Girls cd from Polkadoodles
    • Brads: From my stash

    Football

    I'm falling into a good system for colouring images before I actually need them - take a selection of them to my Mum and Dads as I usually visit them with the boys on a Saturday, so whilst they play, I colour!

    The theme at Charisma Cardz this week is:

    Getting Sporty

    I went with the typical male theme! All the backing papers are from the Papermania 6 x 6 pad 'For Him' which I've inked the edges with chestnut Whispers ink.

    The image is from Crafty Downloads and I've coloured it with watercolour pencils. It's been layered onto pearlescent blue card and then layered onto the card itself. I've not added a sentiment, purely because I've forgotten to!

    • Backing paper: Papermania 'For Him' 6 x 6 pad
    • Image: Crafty Downloads coloured with watercolour pencils

    Monday 28 September 2009

    Big Bloom

    The current Stampin' Chic challenge is a sketch:

    Which I've followed almost exactly! This is once of the other cards that have been ordered for my Mum's Birthday at the weekend. I've used papers from The Big One - I stuck the two dotty sheets back to back and then cut 4 different sized circles from them. Snipped V's from around the edge and then cut deeper towards the centre where the corner of the V was. I then ruffled the petals and layered everything up. The centre of the flower is a black button with card candy centre.


    The black grosgrain ribbon is from my stash (it was 10p a bundle from Blackburn Market a while ago!) And the sentiment is from the Just For Men stamping set.

    The petals are actually quite stiff so it should stand up to a bit of bashing! Oh - look closely at the centre of the card - you can see me taking the photo!
    • Flowers: Papers from The Big One
    • Card candy: Craftwork Cards
    • Ribbon: From my stash
    • Sentiment: For Men stamping set

    Sunday 27 September 2009

    Bam! Comic Superhero!

    Another one by the seat of my pants! This time it is the lovely Papertake Weekly Challenge which is this fab sketch:


    I've used papers from the very soon to be released cd from Polkadoodles - Not For Girls - it's a male themed cd and it will be launched on Create and Craft on 1 October. As soon as I saw the backing paper I had to use it!

    All the elements you see are from the cd - I've resized the 'bam' and the Happy Birthday sentiment so that they would fit the size of my card. I've simply inked the edges of everything and added it - the centre 'bam' is on 3d foam pads and the sentiment is on doubled 3d foam pads.


    Perfect for the superhero in your life! The backing paper comes in various colourways too but I liked the red!

    Robots are Not For Girls

    I didn't think I was going to make this one in time, but I've just about managed it! The Pink Elephant Challenge is a sketch:


    And I've used the brand new cd from Polkadoodles - Not For Girls, which will have its release on Thursday 1 October on Create and Craft! The cd (which you will have probably guessed by the title) is male themed - it covers sports and these cute little robots plus tonnes more! It's a double cd so you get a lot for your money!

    I've printed the two different backing papers at A5 so I got a smaller detail and I've cropped a topper and sentiment so I could use them individually on my card.

    A bit of inking, corner rounding and I've doodled a gold gel line around the edges, and that's more or less it! The added nuts and bolts I got from the Scrap Store ages ago and I thought they'd go well on the card.

    • Backing papers: Not for Girls cd from Polkadoodles
    • Image: Not for Girls cd from Polkadoodles
    • Sentiment: Not For Girls cd from Polkadoodles
    • Tiny nuts and bolts: From the Scrap Store

    Saturday 26 September 2009

    My First Year

    The Digital Ink Challenge this week is a recipe:

    Two designer papers plus 3 brads / buttons or eyelets

    I've been making something for a while (and I hope she doesn't see this just yet!) but this is the front cover - the remainder of the pages are almost finished - once they are I will share it with you.

    Anyway, it's part of a first year book for a baby boy who is due any day.

    The image is a wonderful freebie download from Dawn Moore - Lost in Paper Scraps and it is such a lovely image that I've used it a number of times. It's been coloured with watercolour pencils. The papers are Funky Hand - V Funky, which I have cornered the edges and then doodled a fine black line around the edges.


    The buttons are from my stash and I've threaded some pale blue organza ribbon through the holes. The sentiment is computer generated and I've inked the edges and drawn a fine black line around them too.
    I'm really pleased with how the First Year Book is coming along and I've managed to use my Nesties too!
    • Backing paper: V Funky from Funky Hand
    • Image: Dawn Moore - Lost In Paper Scraps, coloured with watercolour pencils
    • Sentiment: Computer generated
    • Everything else: My stash

    Friday 25 September 2009

    Polkadoodle Challenge 19 - Digi Colouring

    It's Friday again, so it's another Polkadoodle Challenge! This is my last week of setting the Design Team challenges and I hope you've enjoyed them as much as me!

    This week, I challenged the team to:

    Colour a Digital Image

    Now, they could use any image of Polly or Jack, and I choose the Halloween download as I really like the papers that come with it! There are two tutorials to accompany these two cards that I made - the Polly card uses watercolour pencils, and Jack has been coloured with good old felt tips!

    A little bit of inking here and there and some tearing of paper and it all looks more spooky! The fimo spiders are left over from a previous challenge and I think I should make some more for next year!


    For the card with Frankenstein Jack, I've used felt tips and a white gel pen to give highlights. More doodling on this card and inking and it's finished!


    Hope you're able to join in with this challenge - it's open until Sunday 4 October 12noon - go to the challenge post to enter your creation!
    Good luck!
    • All backing papers and sentiments: Polkadoodle Halloween Download
    • Images: Polkadoodle Halloween Download, coloured with watercolour pencils and felt tips

    Tutorial - Digi Colouring with Watercolour Pencils

    And here is the second tutorial to accompany this weeks challenge!

    My equipment is very basic! These are the watercolour pencils (24) that I use and also the brush felt tips (30). The watercolour pencils can be used as ordinary pencils, but they really come to life when a tiny bit of water is added.

    For this tutorial I am colouring Polly Polkadoodle from the Halloween download. I've started with a light and pale layer of colour.

    I've now added more definition to Polly's hat by dipping the nib of my pencil into water - I can now spread the colour more easily and also choose which areas I want to leave as highlights.


    To build up more intense and darker colours, I've used not only the blues but also greens and purples. I would not use the black at this point as to go too dark too quickly may spoil the overall effect.


    The same technique is then applied to her cape. Colour is built up slowly with greens, browns, blues and reds.

    Other smaller areas are now coloured.


    And only now (below) have I added a tiny bit of black here and there to provide a darker contrast to the colour. However, it is really the colour and it's depth that I want to portray which I feel provides a richer and deeper colour than using black as this can be a very flat tone.


    And here are the two images together that I coloured for these tutorials. Same technique applied to both images but different results due to the medium used.


    And this is the card I made with the Polly Polkadoodle image. Papers are also from the Halloween download and the little fimo spider is made by me!


    Hope you've enjoyed the tutorials and that you will be able to join in with the challenge this week!

    Tutorial - Digi Colouring with Felt Tips

    Here is a tutorial to accompany this weeks challenge. There will be another tutorial published just after this one which uses a different medium to colour a digital image.

    My equipment is very basic! These are the watercolour pencils (24) that I use, and also the brush felt tips (30). I use the brush felt tips as the hard nibbed ones tend to 'scuff' the paper and are not as easy to blend with the different shades.

    My two images that I'm colouring - Jack and Polly Polkadoodle from the Halloween download.

    I've started off with Jack and the felt tips. By using a pale blue felt tip, I've coloured his jeans. This is now my base colour upon which I will add darker colours for shadowing.

    I've then 'dotted' darker shades of blue on top of the initial block of colour - this is now providing shadows and form and it also helps to stop some of the hard lines that you get when using felt tips as they don't blend too well, but with this technique, it's not quite as noticeable.


    Once the jeans are completed, I started on Jack's cape. Again, I added the lightest green I wanted as my base colour.

    And slowly built up the shadows - the paler green stays as the highlights.


    Once I'm happy with the cape, I then start on other smaller areas - I've coloured his t-shirt and started on his creepy gloves. Again, I've used the same techniques.

    I've started to add different colours such as purple, blues and reds to build up more definition and to extend my colour range.

    Next the hair and mask are coloured.

    And for extra highlights, I've used a white gel pen and loosely but carefully scribbled over the top of the felt pen where I want highlights. This provides more definition.

    I had a little helper whilst I was colouring the two images - Samuel was on his school holidays and sat with me and coloured his own Halloween Jack with his felt tips! Even though I've enlarged the image to fit an A4 sheet, there is no loss of quality - you can make the image as small or as large as you wish!

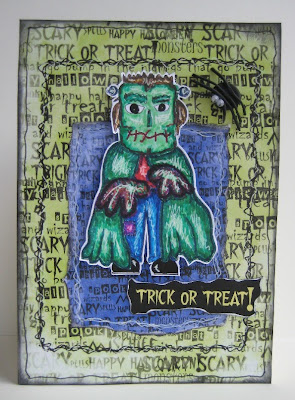
    And this is the card I made with the image - I cut around Jack leaving a fine white border and layered him onto papers from the Halloween download. A bit of inking and doodling and he is complete! Plus the wobbly eyed fimo spider, made by me, of course!


    The second tutorial on digital image colouring follows this post. Hope you enjoyed this one, and go and re-discover felt tips (these were half price in Tesco's - £1.25!)

    Thursday 24 September 2009

    A Slightly Scuffed Wallace and Gromit


    And I've used the selection of Wallace and Gromit items in this months Let's Make Cards. As a rule I don't buy these type of magazines as the kits can be a little ropey, but I do struggle to make male cards and I do like Wallace and Gromit, so I made an exception and bought the magazine.

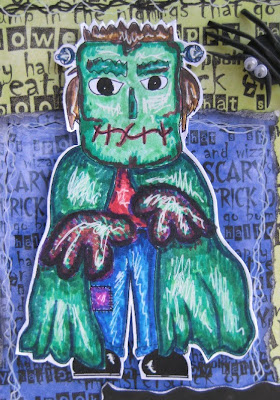
    The backing papers are DCWV Retro 6 x 6 pad and the chocolate brown satin ribbon is left over from the Wedding Stationery that I made during the summer. And the three chipboard elements are from the magazine kit.
    Now I'm actually quite impressed with the quality of the kit and there are loads of chipboard elements and other bits (the card blanks are a little dodgy but I can use them for layering) however, this was soured when I looked closer at one of the chipboard sheets and noticed a fairly large printing flaw:
    Not in one but two places on the sheet, rendering two of the images unusable. Now, I'm not generally one to complain, but on this occasion I am doing. I'm going to send an email to the editor to point out my displeasure and when I get a response I'll share it with you!


    But, despite this, great little kit!
    • Backing papers: DCWV Retro 6 x 6 stack
    • Chipboard elements: Wallace and Gromit kit from Let's Make Cards
    • Ribbon: From my stash

    Bookmark Card

    The Bee Crafty challenge this fortnight is to:

    Make a bookmark

    There is a free image of a stack of books that can be downloaded and this is what I have used as my bookmark. I've also made a card for the bookmark to go with plus this is now earmarked for a Birthday in November - see - getting organised!

    I've used digital papers from About A Boy freebie download from Vicki's blog which I have resized to fit the card blank. The bookmark isn't actually quite finished as I want to laminate it so that the image and letters don't get spoilt.
    I've coloured the image with watercolour pencils and the lettering is cut using my Cuttlebug Baby Face alphabet set. The reverse of the book mark is quite plain but I may change that before I laminate it.

    The scrabble tile lettering on the front of the card is Anita's - it was a bargain £1 so I just had to have it!

    • Backing papers: About A Boy download from Vicki
    • Image: Free download from Bee Crafty, coloured with watercolour pencils
    • Dies: Cuttlebug Baby Face Alphabet
    • Stamps: Anita's Scrabble Tile stamps

    Wednesday 23 September 2009

    Glitzy Sixty

    The CRAFT Challenge this week is a colour combination of:

    Pink and Brown

    It's my Mum's Birthday early in October and I am trying to be organised so decided to make this card for her. No guesses for how old she will be!

    The word book is taken from Funky Daze - there are two word books on the cd - one for females and one for males and it just so happened that the female one was pink and brown colourways! I've printed it all off onto white 220gsm card and it's been printed as per the default.

    I've added pink and brown organza ribbon to the 'bound' edge with a pearl topped hat pin with seed beads for extra detail. The flowers are from a lovely pack given to me by the fab and talented Jozza and I've added some Woodware brown buttons to the centres.

    The silver bow charms I got from somewhere - don't know where as I found them in my stash (in fact I found quite a few charms that I'd forgotten I had so I think I'll be using more of them on my creations in the future!) The charms are tied on with thin satin brown ribbon.

    I've added silver seed beads for highlighting around the edges of the letters. I'm thinking that it looks a bit too glitzy but it sort of works. Well, I've not got time to make another one so it will have to work! The pink heart button I found in my stash too.
    I hope my Mum will like it although I don't think she'll be thanking me for plastering her age all over it!
    I've got another two cards to make for my Mum - requests from family members, so I'd better crack on with those now!
    • Word book papers & template: Funky Daze by Funky Hand
    • Flowers: From Jozza
    • Brown Buttons: Woodware
    • Everything else: My stash